n smikle's LMP car

Post here information about your own engineering projects, including but not limited to building your own car or designing a virtual car through CAD.
User avatar
mep
29
Joined: 11 Oct 2003, 15:48
Location: Germany

Re: Long Control arms

Post

marcush made a good point about damper location and bellcrank orientation.
Think about something like this:
Image
You can mount the springs than on a single tube in the center of the car. It is just a idea. There are possible many similar arrangements. A downside is that it could get difficult to reach the dampers depending what else you plan to place there.

Also try to get the angel Ξ± as big as possible to reduce the forces in the push rod. You can achieve this by lowering the lower a-arm or by moving the bellcrank closer to the tyre. This could also be a argument for shorter control arms.

marcush.
marcush.
159
Joined: 09 Mar 2004, 16:55

Re: Long Control arms

Post

with the tub not really much elevated it would also be a good idea to think about
pullrod layout,if anything this will help to lower CG and weight.
The real reason for putting the rockers on top of the tub was purely space available in the tub and very leimited suspension travel .Not having the rockers in double shear will put huge bending loads into the rockerarm retention,so in your case a double shear arrangement will help to get this critical area as stiff as possible.

Did you look into the deflection of all those components and bearings...it is quite possible that a lot of your wheels movement is actually flex in the arrangement not spring damper movement...

Carlos
Carlos
11
Joined: 02 Sep 2006, 19:43
Location: Canada

Re: Long Control arms

Post

You might consider a rocker-type front suspension:
Image
An exposed shock/spring suspension:
Image
A wishbone torsionbar suspension:
Image
Heres a square tube spaceframe with stressed panels, with some details on tube sizes and suspension details that might be interesting:
http://www.jblmotor.com/JBLchassis.html

marcush.
marcush.
159
Joined: 09 Mar 2004, 16:55

Re: Long Control arms

Post

Carlos wrote:You might consider a rocker-type front suspension:
Image
An exposed shock/spring suspension:
Image
A wishbone torsionbar suspension:
Image
Heres a square tube spaceframe with stressed panels, with some details on tube sizes and suspension details that might be interesting:
http://www.jblmotor.com/JBLchassis.html
the rocker layout is obvious but heavy + way up in the monocoque.
a torsion bar layout could be a nice item but adding cost.
I my view you just have to do a matrix and feed in all the pros and cons for each
and value those and then decide...the approach- for the hell of it- will surely sideline and distract your efforts and lead to compromise in key areas that need
all the brains you got.

User avatar
PlatinumZealot
559
Joined: 12 Jun 2008, 03:45

Re: Long Control arms

Post

yeah, I should have stuck to that matrix method from the beginning. I have a habit of just straying and chucking in everything at once then selecting the best option. I actually had a rocker suspension in there at one point 8)

The front will be a double shear arrangement, the rear now is single shear because of other considerations so instead I will have to make the bell-crank parts stronger if required.

Quick calculation for the bell-crank spindle:

From using the motion part of the program:

Bending moment on the rocker arm spindle is going to be about:
12,000Ncm to 40,000Ncm depending on the situation static to shock etc, if the car weighs about 1200kg.

shear force around the spindle is about :6000N to 20,000N

axial force is about 3000N to 9000N

(the results from the program is close to rough calculations: The bell-crank and Push-rod are at about 26* from horizontal, and push-rod is 10* leaning forward from the lateral. The actual spindle is very short as you can see so the bending is not so high)

The stress is small ~ 1700N/cm^2 with a solid 4cm spindle, but realistically the spindle might be a hollow tube with a bearing around it. I have no clue of the ID or OD since I have never seen a bell-crank removed from it's spindle before, but lets use 40mm OD and 35mm ID, the stress then turns to 7000N/cm^2 for the bell-crank spindle. This is low, even if you apply Sf and fatigue. So the stress from to the bell-crank is not as high as it may seem at first.

Anyway, I took note of all the suggestions. I made suspension a little more sensible now. More Pics are coming up after i work on the front end.
πŸ–οΈβœŒοΈβ˜οΈπŸ‘€πŸ‘ŒβœοΈπŸŽπŸ†πŸ™

Racing Green in 2028

User avatar
PlatinumZealot
559
Joined: 12 Jun 2008, 03:45

Re: Long Control arms

Post

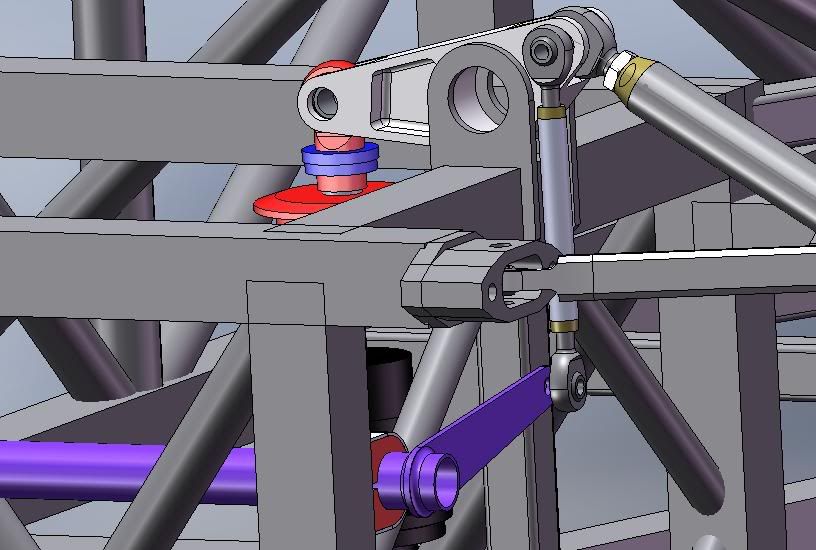
This is the front. It uses a regular Anti roll bar. The linkage connects to the push-rod side of the bell-crank, i notice that most of the cars I see have the linkage on the shock side of the bell-crank. Is there an implication to the smaller Roll bar rotation from doing this?


Image


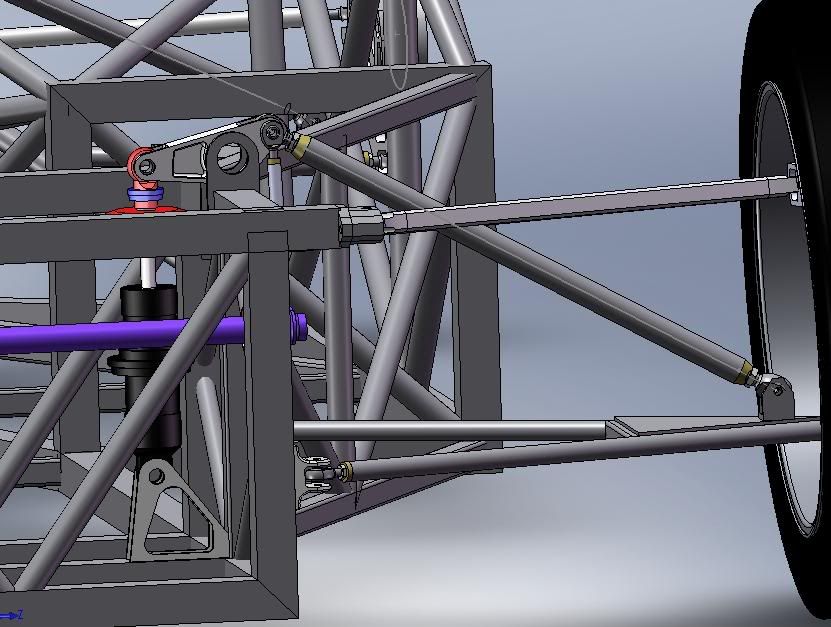
This is the overall view of that front corner thus far.

Image

Not everything is finalised though, for example: the length of the shock seems too short, the bracket at the bottom of the push-rod needs to be redone and the height of the bell-crank needs to be raised.

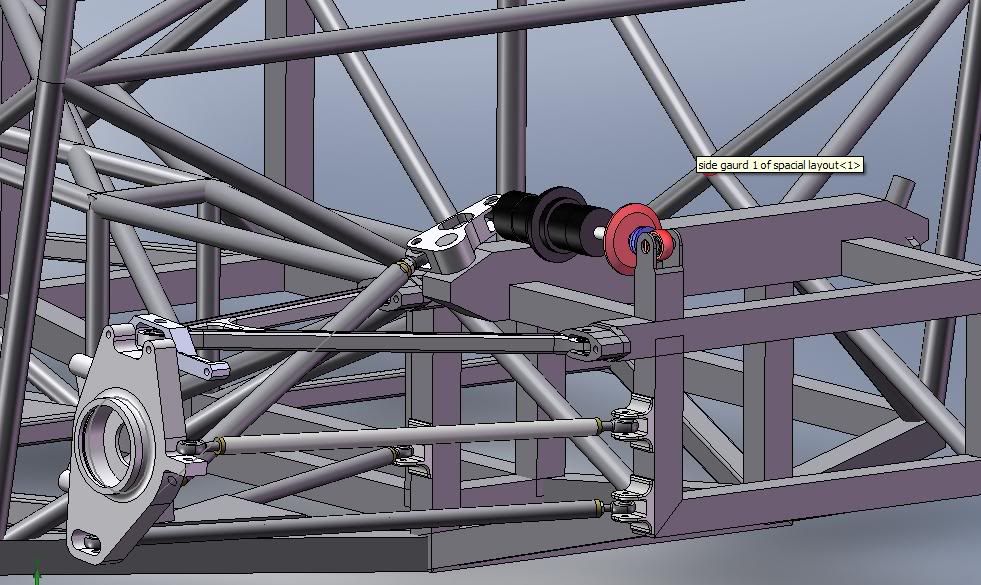
I also modified the rear a little. I moved the shock mount in line with the edge of the rear box part of the frame to make it stronger. A rear bulkhead to hold the rear wing and the rear bumper is to go behind.

Image


Any other detail you guys notice that should be changed?
πŸ–οΈβœŒοΈβ˜οΈπŸ‘€πŸ‘ŒβœοΈπŸŽπŸ†πŸ™

Racing Green in 2028

marcush.
marcush.
159
Joined: 09 Mar 2004, 16:55

Re: Long Control arms

Post

why donΒ΄t you put the ARB arms inside the frame completely and put the arb rods directly to the bolt securing the damper to the bellcrank?

This way around you could have spherical fixation of the arb to the frame ,avoiding any possibility of bind in that area and a lot easier arb change+ you could use One size bearing for all ARB diameters.. ...
got the idea? ...just move the aRB blades inside the frame rails and leave the ARB mounts were they are.

with the current slit type bushing you got the worst in terms of friction or unwanted clearance to avoid sticking of the ARB in torsion with my proposal you will
be able to get a nice free svivelling action even when the thinnest torsionbar is used..of course one of the spegres has to be fixed type the other has to provide some axial float to prevent bind...

Go to the website of

http://www.igus.de there you can find full plastic big spherical bearings ,quite cheap they give free samples of their products on a simple request ...

http://www.igus.de/wpck/default.aspx?pagenr=2507


see what I thought off ? I did actually use these on some of my development ARBs
as it was saving weight and money and it worked quite well I have to say.
the whole catalogue and product range is very useful when building a race car I think.and they supply CAD files of the parts as well.. :mrgreen:

of course the site is also available in english ...apologies for sending the link to german language.

http://www.igus.de/wpck/default.aspx?Pa ... 7&CL=GB-en

User avatar
mep
29
Joined: 11 Oct 2003, 15:48
Location: Germany

Re: Long Control arms

Post

Nice to see the progress you are doing.
Especially that you adapted the vertical damper arrangement.

I noticed something else.
There is a bit of space left between your lower a-arm and the rim.
You can lower your a-arm so you will be able to mount it to the node of your tubes on the chassis instead of putting your tubes into bending.
This will also reduce the forces in the pushrod and in the a-arms as the pushrod angle and the leverage on the upright increases. Furthermore you will get the weight closer to the ground.

You might also raise the tubes of the chassis a bit to keep the angle of the a-arm.
This will make your chassis slightly lighter.
Also think about putting the vertical tube on a slight angle to get rid of the outstanding tube to the top suspension pick up point.

BTW:
How about the angle between the pushrod and the bellcrank?
Shouldn't be there a 90 degree angle between the pushrod and a line between the pushrod link and the bellcrank bearing to reduce the force on the bearing and to get all the pushrod force into the spring?

Image

User avatar
PlatinumZealot
559
Joined: 12 Jun 2008, 03:45

Re: Long Control arms

Post

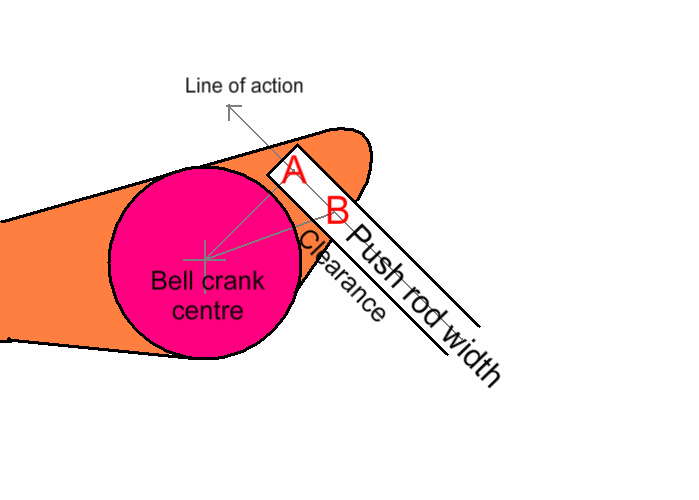
The line of action of the push-rod to bell-crank is at 90 degrees at the design radius intially. It's just that the apparent angle depends on what radius that you are looking at. For example the design radius (effective radius :?: ??) is 40mm, the line of action touches this arc at a tangent. So it's effectively at 90.

If you use an imaginary arc with radius instead to the push-rod bearing, the angle is going to seem more than 90 degrees as you have seen. The line of action is still tangent though.

I noticed that both setups will only be at 90 degrees for only one instance in position anyway; as soon as the push rod moves the angle decreases. This is because the arc of the control arm is not the same radius as the bell crank arc. So I focused on keeping it in a small range around 90.

Also the arrangement where the push rod bearing is actually on the active radius(or arc whatever you call it) has less clearance so a you only get a smaller rotation before the push-rod hits up into the bell-crank. This was mostly the reason for me to offset the bearing (but still keeping it on the initial line of action)

Point A is the setup with the bearing right on the effective radius. Imagine the bell crank rotation CCW, there will be a point where the push rod clashes into the pink area. The effective radius also decreases slightly

Point B is the setup where the bearing is on the same intial line of action, but is offset some distance from A. THe advantage of this is that the bell crank can rotate through a larger angle before the body of the pushrod hits into it. The other advantage is that since B is rotation on a larger radius (not effective radius just the radius to the bearing).. the pusrod stays more vertical and hence the effective radius increases slightly.

Image

This can be good in terms of load on the push-rod too.

So that is my reason for that..
πŸ–οΈβœŒοΈβ˜οΈπŸ‘€πŸ‘ŒβœοΈπŸŽπŸ†πŸ™

Racing Green in 2028

User avatar
PlatinumZealot
559
Joined: 12 Jun 2008, 03:45

Re: Long Control arms

Post

noticed something else.
There is a bit of space left between your lower a-arm and the rim.
You can lower your a-arm so you will be able to mount it to the node of your tubes on the chassis instead of putting your tubes into bending.
This will also reduce the forces in the pushrod and in the a-arms as the pushrod angle and the leverage on the upright increases. Furthermore you will get the weight closer to the ground.
This is for the front diffuser and crash structure. The mounting is not Ideal but the way the front diffuser will look, the arms have to be up and out of the way and the crash structure I drew needs the front mounting area. I am not really afraid of bending loads. I just have to design the frame to take the higher bending load. The bending is not that great either. I Just make the part to take it (can also add a skin to it). The F1 Monocoques for example.. I observe they are loaded on the surface.. especially parts like the nose. To me it is just something to deal with not all the time I can avoid it..

This is a good example...

http://upload.wikimedia.org/wikipedia/c ... as_c22.jpg
πŸ–οΈβœŒοΈβ˜οΈπŸ‘€πŸ‘ŒβœοΈπŸŽπŸ†πŸ™

Racing Green in 2028

User avatar
PlatinumZealot
559
Joined: 12 Jun 2008, 03:45

Re: Long Control arms

Post

Alright..thanks for the pointers. I think the Anti roll bar will be changed as suggested... The trapezoid shape to the front box is also a possibility. There was a reason I had those stubs sticking out to hold the top control arms but I can't quite remember why i did it.. :-k

I hope you guys understand the "T" shaped anti roll bar because it's going in the back and only only have a slight idea of how it works..
πŸ–οΈβœŒοΈβ˜οΈπŸ‘€πŸ‘ŒβœοΈπŸŽπŸ†πŸ™

Racing Green in 2028

ReubenG
ReubenG
0
Joined: 21 Apr 2004, 15:31

Re: "middle control arm"

Post

I notice on your rear suspension that you are using an offset (middle) arm to control the rear toe angle - so you have a multi-link set up rather than a conventional double A-arm / wishbone set up. I stand to be corrected, but I was of the opinion that this forces rear toe angle to change as the wheel moves vertically. This can be minimised but it will contribute to some rear wheel steering - so if you have gotten it wrong you can get rather unexpected behaviour from the rear end.

The chassis mounting point of this toe angle control arm is not helping the bending stresses in the vertical square tube. Also the angle (in the XZ plane on your drawings) at which the middle control arm, coupled with the small offset for the hinge means that vertical square tube will also experience a torque about the Y axis.

What I am asking is if the benefit of rear toe angle changes (which are only beneficial if your kinematic analysis is good) from the offset arm worth the additional structural problems? If you put the toe angle control arm in the same plane as either the upper or lower control arms, then rear toe angle stays constant, and you can integrate the attachment point into one of the existing points - so fewer point loads on chassis.

User avatar
PlatinumZealot
559
Joined: 12 Jun 2008, 03:45

Re: Long Control arms

Post

I actually had the tie rod in plane with the Control arms (you can see a little tab for them at the top of the upright) but decided to try the variable toe style setup.

Making the arrangement like a multi-link sorta gives the car more setup variables. I noticed that when the mount is positioned relatively high you get toe out under braking, when the mount is positioned relatively low you get toe in under braking. I really like that aspect of it so I decided to go with it. The position that you see it in now is a position where there is almost zero toe change, I will add like an "upper setting" and a "lower setting."

The extra bending moment of course will be there, but I can live with that. There will be a ribbed plate structure bolted on at the back where the rear wing and other things will mount to, that will add some stiffness. Overall the bending was expected when I positioned the tie rod that way. I merely decided that the positions of the parts were to be a higher priority than trying to make the frame the strongest from the get go. The strength of the frame is something that I can manipulate more easily. There are also times when the loads are not enough to pass the design stress (or deflection) so I am not too worried about bending loads.
πŸ–οΈβœŒοΈβ˜οΈπŸ‘€πŸ‘ŒβœοΈπŸŽπŸ†πŸ™

Racing Green in 2028

User avatar
mep
29
Joined: 11 Oct 2003, 15:48
Location: Germany

Re: Long Control arms

Post

I am not really convinced by your arguments for the pushrod angle.
Also the arrangement where the push rod bearing is actually on the active radius(or arc whatever you call it) has less clearance so a you only get a smaller rotation before the push-rod hits up into the bell-crank. This was mostly the reason for me to offset the bearing (but still keeping it on the initial line of action)

Point A is the setup with the bearing right on the effective radius. Imagine the bell crank rotation CCW, there will be a point where the push rod clashes into the pink area. The effective radius also decreases slightly
Ok you say the pushrod will touch the bellcrank more easily when there is a 90Β° angle.
Solution: You will have to make the bellcrank bigger there is nothing bad about this.
I noticed that both setups will only be at 90 degrees for only one instance in position anyway; as soon as the push rod moves the angle decreases. This is because the arc of the control arm is not the same radius as the bell crank arc. So I focused on keeping it in a small range around 90.

The other advantage is that since B is rotation on a larger radius (not effective radius just the radius to the bearing).. the pusrod stays more vertical and hence the effective radius increases slightly.
Hm.....
Yea the angle slightly changes during movement.
Sounds like you want to make the best out of it and even get an advantage when the angle changes.

I guess you design the car in normal ride height position.
From the picture I say you will get this:

The blue arrow represents the force from the tyre. This force is split up into the green one who acts on a 90Β° angle on the bellcrank and therefore will be transmitted into the spring. The red one will go into the bearing of the bellcrank and is therefore not loading the spring. It is easy to see that you are currently loosing a significant amount of your force.

Furthermore there is something else happening:
When your pushrod moves up the angle will get closer to 90Β°. So there is less force lost and more force goes into your spring. This will cause something like a degressive effect of your spring. The more load you get on your tyre the more it will move That is the opposite of what you want.
Normally you would go for a progressive effect.
The more load you have the less the tyre will move.
It is better to start with a 90Β° layout so the force who gets into the spring will be reduced when the bellcrank rotates.

Image

That is my point of view.
I would like to hear what other people think about this.

User avatar
ringo
230
Joined: 29 Mar 2009, 10:57

Re: Long Control arms

Post

I think it depends on the geometry of the push-rod to the a arm and the bell crank.
In the case of the rod at 90* the full force will be experienced initially; at an instant. As the rod rotates the bell-crank it will produce the forces you have in the pic at all times after that initial position.
In the case of greater than 90*, it will have the secondary force on the bearing initially s you say, however this rod will be shorter than that used for the 90* setup with a bigger bell crank radius. So it's hard to compare unless you map out the displacements. This bearing force can be smaller too, since the angular displacement will be less, with the shorter push-rod and bigger radius,for the same wheel displacement.
The wider angle crank will reach a point when there is no radial force on the bearing just as the one at 90* too.
There doesn't seem to be much of a difference, i guess the geometry will determine the behavior.
For Sure!!